Submit an application for exceptional transports and exceptional vehicles that exceed the maximum legal weights and dimensions set in Arts. 64 – 67 of the Ordinance on Road Traffic Rules. Applications for import and transit journeys as well as federal vehicles are addressed to FEDRO; for export and domestic journeys, it is the approval authority of the canton in which the journey starts. In both cases, further cantons concerned may be involved in the approval process. You can find further information at Sonderbewilligungen - Ausnahmetransporte und Ausnahmefahrzeuge
Creating a new application

For exceptional transports and vehicles, you can either submit an application for a permit directly or request a preliminary clarification. You only select the desired option once you have entered all the data, at the time of submission. In any case, you must first submit a so-called ET application. To do so, select the menu item “Create a new application” (1) and complete the page that opens:
Select the application type “Exceptional transports AT” (2) and enter a designation (3). You can freely choose the designation. It will help you to find the application again later. Under special details (4), you can, for example, enter the reference number of your order. This indication will help you to classify the application and does not have to be completed. Then choose the language in which the permit should be created (5). As the permit may contain instructions for the carrier, it is best to have it issued in the carrier’s language. This is independent of the language in which you complete the application.
If a field is marked with a small question mark, you will find more information on its meaning if you hover over it with the mouse. You can only press the “Create a new application” button (6) once you have correctly completed all fields marked with a red asterisk *.
The dossier
When you press this button, a dossier will be created and you will be shown the application-filing step:
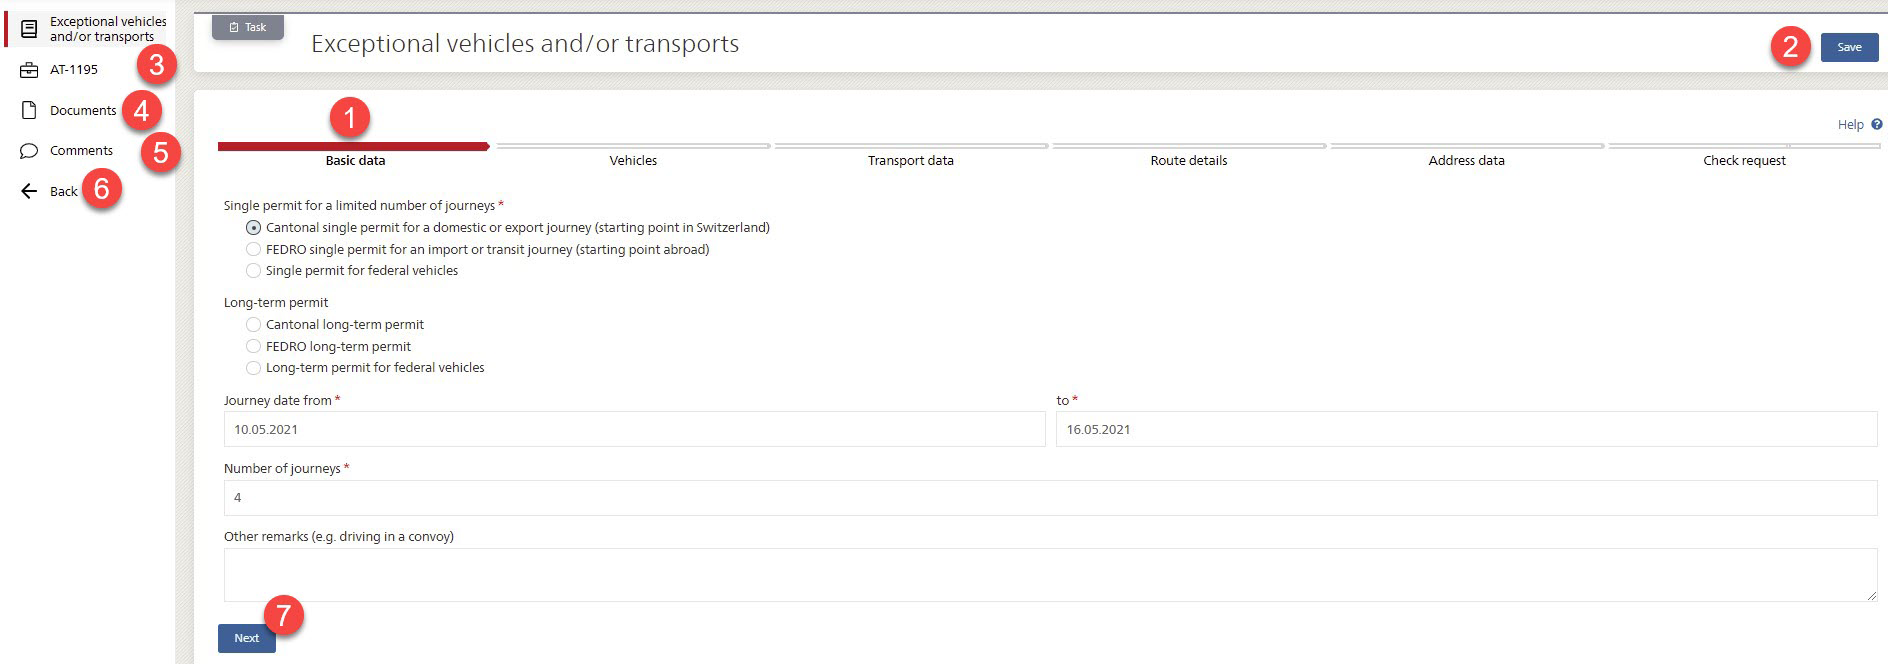
A dossier is a collection of all the data, tasks and documents created in connection with your application. The first task is to enter the application data. This is done in several steps which you are guided through; the first is entering the basic data (1). If you are not yet able - or don’t want - to complete and submit the entire application, you can save it temporarily (2). You can also leave the screen for entering your data at any time. By clicking on the dossier number, here AT-1195 (3), you can access the detailed screen of the dossier. Later on, you can see here the status of the work of the approval authorities. But at present it appears you have not yet submitted your dossier, so no tasks will be found there yet for the authorities. You can also navigate to the document management function of the application (4), enter a comment for FEDRO (5) or go back to the dossier list and to the main menu (6) if, for example, you would like to enter an address or a vehicle before submitting the application.
If you exit the form without pressing Save, your entries made in the current step will be lost. But entries made in previous steps will remain saved.
ET basic data
To create the application, please now complete the details for the “Basic data” step. You can apply for a single-journey permit or a long-term permit. Since different authorities are responsible and the information required may also differ in some cases, you must also indicate here whether the application is for a cantonal or a FEDRO permit.
In this, as in the following steps of the application process, the fields you have to complete are interdependent. For example, for a single-journey permit you must indicate the journey data and the number of journeys, whereas for a long-term permit you must enter the validity period. FEDRO long-term permits are always valid until 31 January of the following year, so this date is already set as the “until” date when you select “FEDRO long-term permit" and cannot be changed. On the other hand, different rules apply to cantonal long-term permits. You must therefore enter the desired “until” date here. But this can still be adjusted by the approval authority, depending on the canton.
Here too, you have to complete all fields marked with a red asterisk, and a red text below the field will tell you when your entry does not comply with the specifications. Only when all the necessary fields have been completed correctly will the “Next” button appear (7). If you think you have completed everything correctly but the button still doesn’t appear, it’s best to navigate through the entire form with the tabulator, from field to field. In this way, any further error messages, if applicable, will be displayed.
The “Next” button will take you to the next step “Vehicles”.
ET vehicles
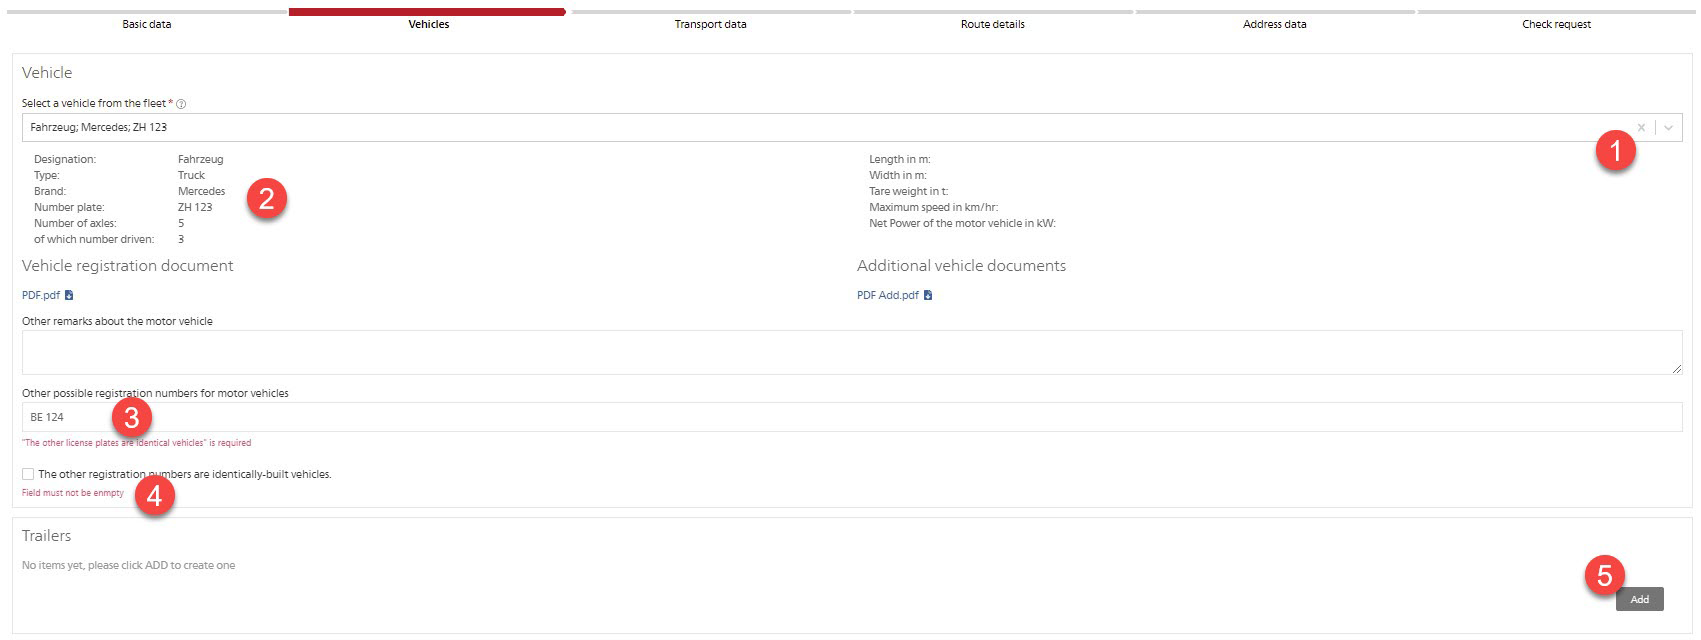
Before creating an ET application, you must enter the vehicles and trailers concerned in your fleet. In the “Vehicles” step of the application, you can then only select those vehicles to add them to the application. To do so, unfold the drop-down list “Vehicle from the fleet” (1) to display all your vehicles or enter the first characters of the designation, brand or number plate to filter this list accordingly. After selection, the data from the fleet will automatically be included in the application (2). If you want to indicate several vehicles, because it’s not yet clear which one will finally be used for the transport, you can enter their number plates in the field “Further possible number plates for motor vehicles” (3). But this is only permitted if the vehicles are identical in construction. Therefore, as soon as you have entered something in the field for further number plates, you must confirm this by activating the following checkbox (4).
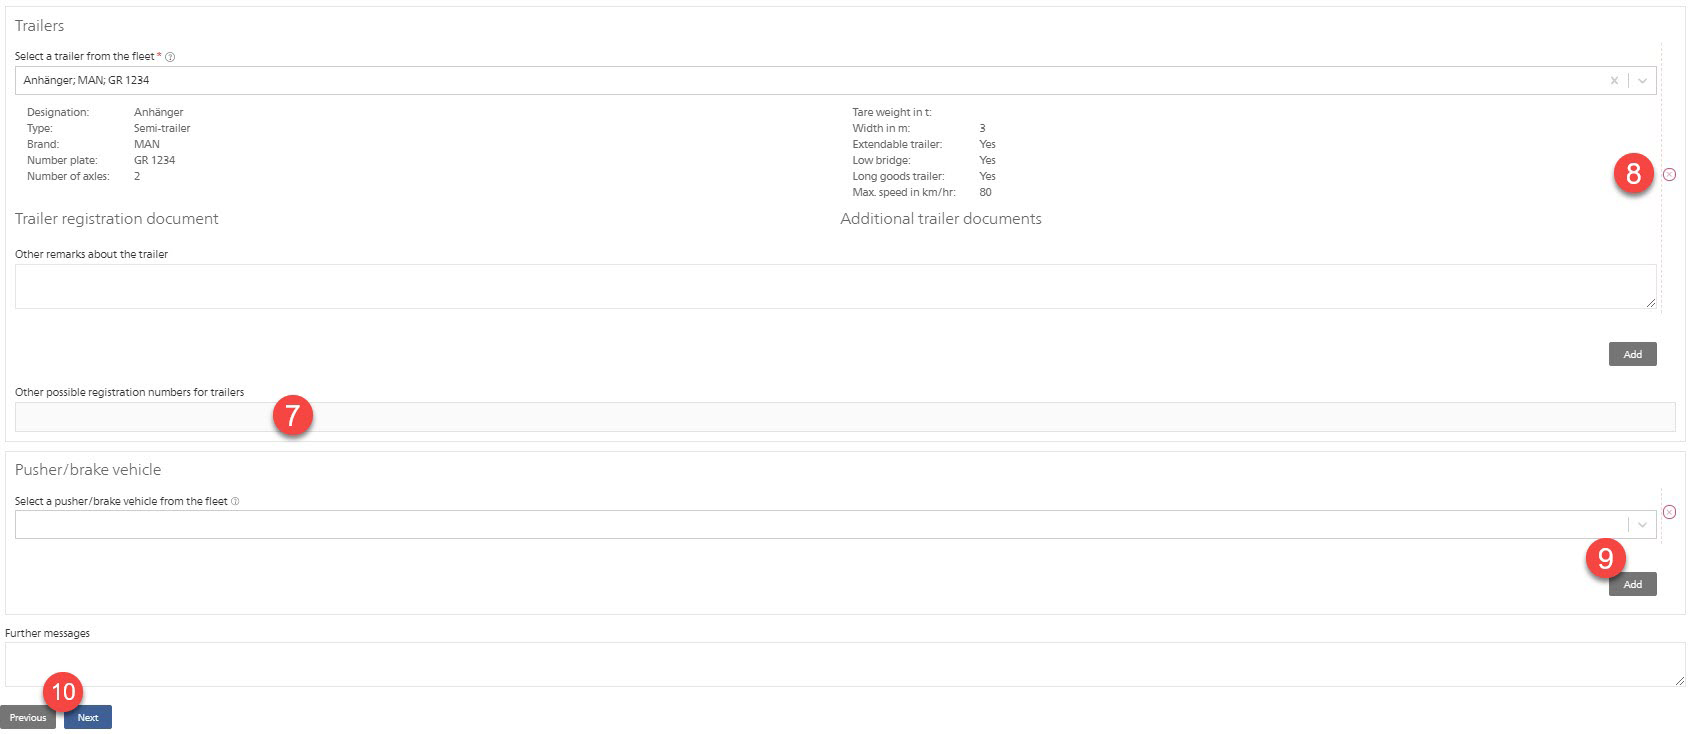
Once you have entered the motor vehicle’s data, you can add one or more trailers. The necessary fields are shown with the “Add” button (5) in the “Trailer” section. The trailer is selected in the same way as the motor vehicle. Here you can also add further possible number plates. But this is only possible for motor vehicles OR trailers in each case. If you have already completed the field for motor vehicles, it’s blocked for the trailer (7) and vice versa.
If you’ve added too many fields for trailers, you can remove the surplus with the red cross to the right (8).
As soon as you’ve added a trailer, you can also add pusher/brake vehicles with the “Add” button in the corresponding section (9). This works in the same way as for motor vehicles and trailers. But you can’t enter any additional number plates here.
As soon as you’ve completed all the data correctly, the “Next” button appears again. As you are now on step 2 of the application, there’s also the possibility of going back to the previous step to check or adapt it (10). But first save what you have entered, otherwise that data will be deleted!
ET transport data
Click on “Next” to go to the transport data. What you have to enter here depends on the vehicles with which the transport is to be carried out. If you have selected a work motor vehicle in the last step, the application always assumes it’s an unladen journey. For example, the following fields are displayed if you have entered a work motor vehicle with a trailer and a pusher/brake vehicle:
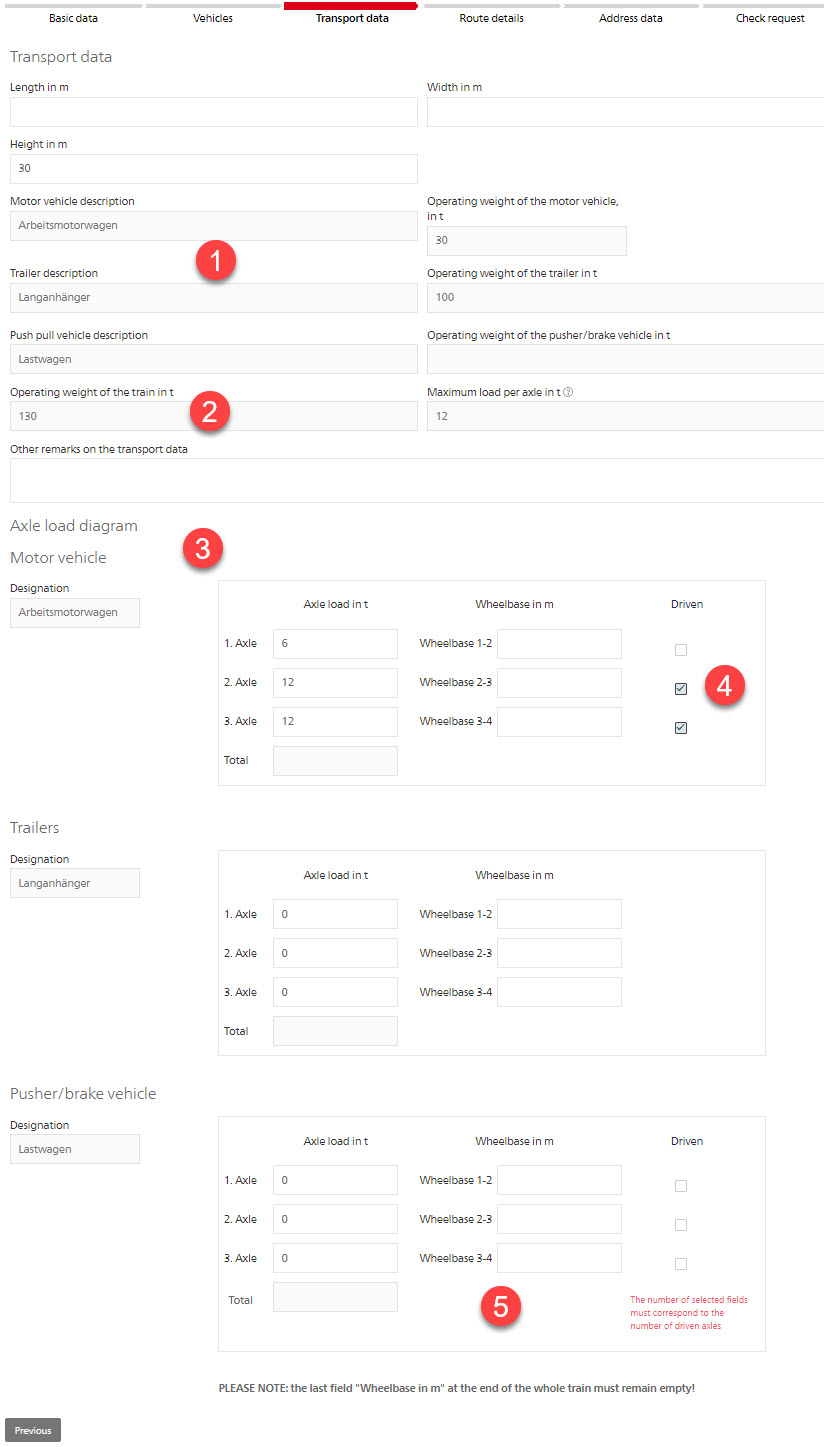
Various fields can’t be edited and are greyed out because they are taken over directly from the vehicle fleet (1). If you want to change them, you must do so there. In this case, go back to the main menu and make the adaptations. When you then come back to the application form, you need to select the modified vehicle again in the “Vehicles” step so that the changes become active.
Furthermore, in the example shown, the calculated operating weight of the whole train is more than 44 tons (2). For this reason, you must also enter the axle data. The “axle load diagram” section (3) appears only when the total weight exceeds 44 tons and shows all added vehicles and the loads per axle and the wheelbases. In the case of motor vehicles, you must also specify which of them are driven (4). The application checks whether the loads correspond to the weights indicated, whether or not the total wheelbases are longer than the train and whether the number of selected checkboxes for “Driven” corresponds to the number of driven axles stored on the vehicle. Please also note that the last field “Wheelbase” must remain empty (5), because there is, of course, one wheelbase less than the number of axles. In the case of lifted axles, 0 (zero) must be indicated for the axle load and wheelbase.
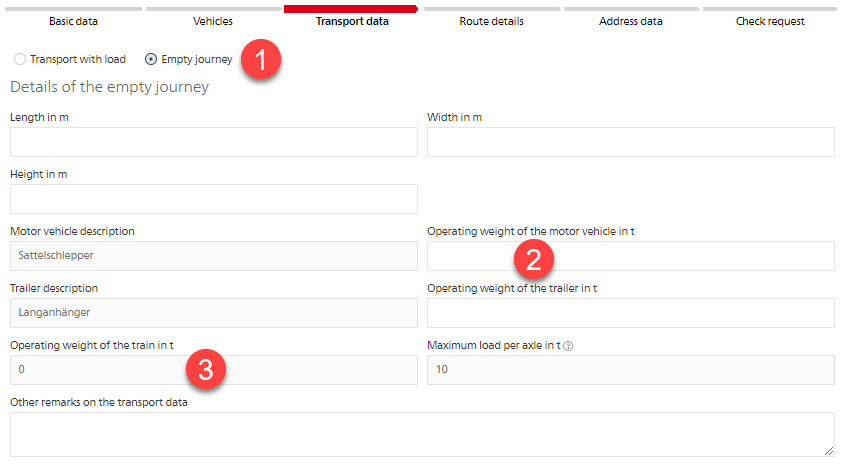
With every other type of vehicle, you must first choose whether it’s an unladen or a laden journey (1). This also affects the fields to be completed. For an unladen journey, the data is entered largely in the same way as described above for the work motor vehicle. The most important difference is that for such an unladen journey, pusher/brake vehicles that have been selected are not taken into account, as this combination is not provided for. In addition, the weights here are not taken over from the vehicle fleet, since at most some fastening material may still be carried that influences the weight (2). Here you must complete at least the field in which the legal limits are exceeded. If it’s the weight, you must enter the weight of the motor vehicle and trailer so that the total weight of the train (3) can be calculated correctly.

In the case of a transport with a load (1), additional details must be provided about the load. What’s important is the exact designation of the load and the number of items (2). In addition, for a single-journey permit, all dimensions of the load must be indicated (3), and for a long-term permit at least the dimension at which the legal limits will be exceeded. The other dimensions (4) are inclusive of the load in each case and here too the fields need to be completed to indicate when the legal limits are exceeded. Here again, various checks are made between the fields:
- an overhang cannot be longer than the total length of the transport
- the operating weights cannot be lighter than the tare weights
- if the height of 4 m is exceeded during a transport with trailer, the height of the loading surface area must be indicated
- the operating weight of the train is automatically calculated from the individual operating weights; it must be greater than the weight of the load
- if the total weight exceeds 44 t, the weights of all parts of the train must be indicated.
In all three variants, if the total weight exceeds 44 tonnes, the axle data must be indicated, as described above.
If you make an unauthorized entry in a field, an explanation will be displayed in red next to the field. Some checks can also be made only when saving, or when you press “Next”. Then any errors will be displayed at the bottom of the form near the buttons. Pressing the “Next” button also calculates whether the dimension and weight limits of Article 79 paragraphs 2 and 3 of the Traffic Regulations Ordinance of 13 November 1962 (VRV; SR 741.11) are exceeded (length 30 m, width 3 m, height 4 m, operating weight 44 t, axle load 12 t). If this is the case, we will refer to the application in what follows as “>79”. All approval authorities concerned must then be involved, i.e. all cantons in which cantonal roads are driven on and FEDRO when highways (motorways) are driven on. If the dimensions and weights all remain below these limits, the application is deemed “<79” and may be approved only by the canton in which the journey starts or, as applicable, only by FEDRO.
This also has an influence on the indications necessary in the next step.
ET route details
This step may require very different details, depending on the type of application.
Long-term permits <79 are always valid for the whole of Switzerland. If you have chosen a cantonal long-term permit in step one, you only need to indicate here which canton should issue the permit. No further details are required for FEDRO long-term permits.
Long-terms permits >79 to FEDRO can be issued for one of 33 defined sections of highways. If you select this (1), you will find in the form a link (2) to the FEDRO website, where these route sections are described. Then select the desired section in the selection list (3) and press “Next”.

But long-term permits >79 to FEDRO can also be route-specific if they can’t be covered by any of the 33 route sections. But for such a long-term permit with a load, you must have completed all fields concerning the load. As long as this is not the case, you cannot select “Route-specific long-term permit” (1). This will be displayed with a message to this effect (2). Then press “Back” (3) and complete all fields under “Load” in the last form. When you now come to the route details, you can complete “Route-specific long-term permit” and the other fields.

For these and all other types of route-specific permits, i.e. cantonal long-term permits >79 and all single-journey permits, you must provide exact details of the beginning and end of the journey requiring a permit. In the case of import and transit journeys, first select the country from which you will be entering Switzerland (1). A selection list will then be displayed in which you need to select the border crossing point (2).

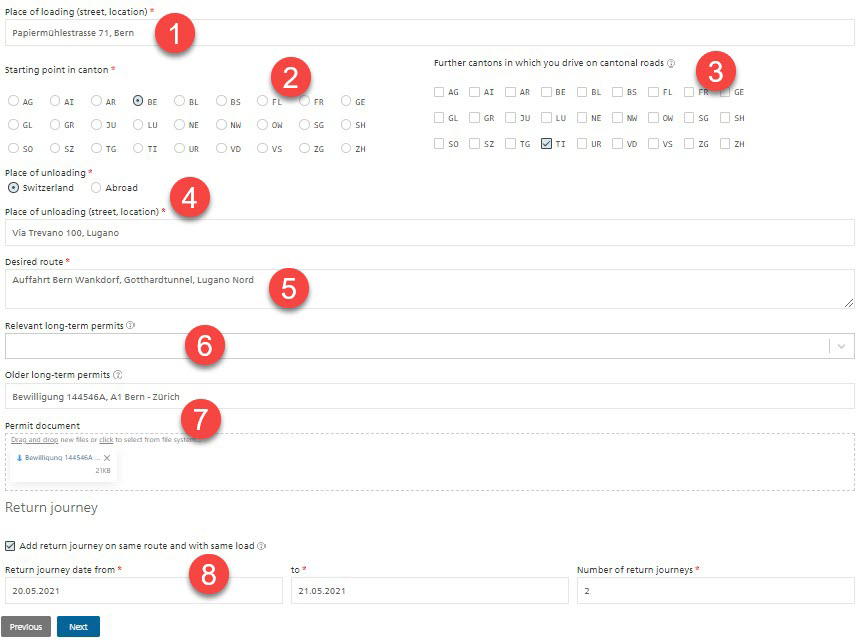
For export and domestic journeys, on the other hand, you must enter the address of the starting-point in Switzerland, i.e. the street and town/city where the journey requiring a permit will begin (1). You must also select the canton in which the journey will begin (2), as it is responsible for issuing the permit. If, in a > 79 application, you will be driving on cantonal roads of other cantons, you need to select those cantons as well (3). This is not necessary for cantons which you only want to drive through on highways. Your application will be forwarded to all the cantons selected. This is not necessary for cantons which you only want to drive through on highways, as FEDRO is responsible for this part of the route.
For the place of unloading, first select whether this is in Switzerland or abroad (4). Here again, if the destination is in Switzerland, you must enter the address of the destination or, if the destination is abroad, select the country bordering on Switzerland and the border crossing point.
Then enter your desired route (5). If you already have a currently-valid long-term permit for part of the route that has already been issued in the new SA SP, you will find the corresponding dossier under “Relevant long-term permits” (6). You can attach the permit document here, so that the approval authority is informed about it. If the long-term permit was issued before the introduction of the new SA SP, you can enter the permit number and a description under “Older long-term permits” and attach the permit document (7).
If you want to return on the same route and with the same load and the type of application (import/transit, export/domestic or federal vehicle) does not change for this route, you can apply for the return journey in the same application. To do so, select the corresponding checkbox and enter the journey date and number of journeys (8). Please note that the return journey can no longer be applied for in the same application if the responsibility changes, i.e. in the case of export journeys where the return journey becomes an import or vice versa. Therefore, this checkbox only appears if the starting point and destination are both abroad or both in Switzerland, i.e. for transit and domestic journeys or for federal vehicles and always only for single-journey permits. It is no longer possible either to apply for onward journeys with a modified load in the same application.
ET address data
In this step, the address data of the applicant, carrier and invoice recipient must be indicated.
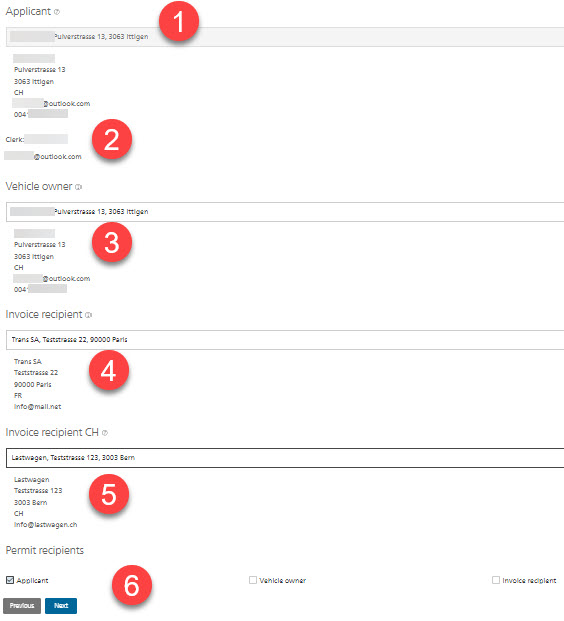
As the applicant (1), the main address of your group account is automatically selected, as you are responsible for this application. You can’t choose another address here. Your name and e-mail address (2) are also displayed here. So, it can be seen which member of the group account created the application.
As vehicle owner (3) and invoice recipient (4), the main address of your account is also completed first. But here you can select any other address from your address management function. Since some cantons require an invoicing address in Switzerland, you must enter such an address under “Invoice recipient CH” (5) if the actual invoice recipient has a foreign address.
Finally, you can indicate to whom the permit should be sent (6). Once it has been issued, it will be sent by e-mail to the selected parties. Confirmation of the application and the associated application document, on the other hand, will always be sent to the applicant’s e-mail addresses after submission (to you personally and to the main address) AND to the invoice recipient in order to inform him/her/it of the application.
Press “Next” here as well to check and submit the application.
Checking an ET application and submitting it for a permit or preliminary clarification

In the last step “Check application”, you can use the “Download preview” link (1) to generate a PDF version of the application so as to check your entries. To submit the application, you must tick the checkbox (2) to confirm that you have read and accepted the special terms and conditions. Only then will the buttons “Submit for approval” (3) and “Submit for preliminary clarification” (4) appear at the top. With “Submit for approval" you apply for an official permit subject to a fee. With “Submit for preliminary clarification”, the approval authorities will only check whether such a journey is possible at all and inform you accordingly, either at no charge or at a significantly lower cost. As soon as you press one of these buttons, the application will be submitted to FEDRO or to the approval authorities of the selected cantons and you will receive a PDF version of it as confirmation by e-mail. The dossier overview will now be displayed:
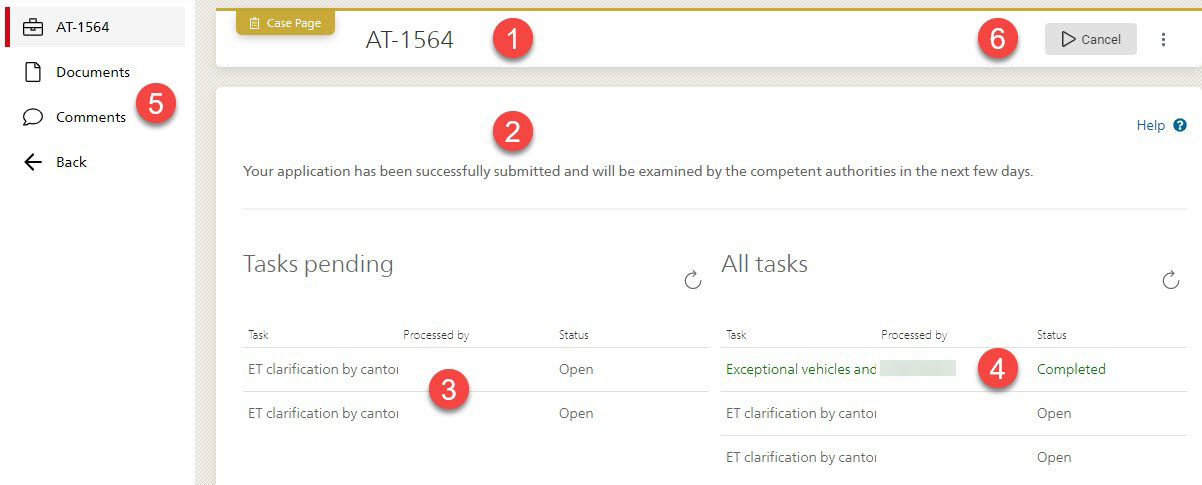
Here you will find the so-called dossier number “AT-1564” (1), which is a unique identification of your dossier. By means of this number, you can find your dossier in the dossier list. The number will also be mentioned in every communication about the dossier. The detailed screen will display the current status of the dossier (2), including all open tasks (3) that now have to be carried out. In this case, the approval authorities of the cantons of Bern and Ticino have to examine the dossier. It can also be seen that you’ve submitted your applications for a preliminary clarification. You will find all open and already-completed tasks on the right, including your own - preparation of the application (4) - marked as completed. You will also find here the navigation options explained above (5). And if your plans should change, you have the option of cancelling your applications (6), i.e. withdrawing them as invalid. This is possible free of charge with an application filed to FEDRO, but only as long as the permit has not yet been issued. In applications to a cantonal approval authority, you should clarify possible financial consequences in advance with the authority concerned.
What happens next?
The dossier will now be assessed by the approval authority of the competent cantons and/or by FEDRO. If any further details are required from you, the authority will get in touch with you via the comment function. You will be informed by e-mail, as you will if the application cannot be approved. As soon as the permit is issued, it will be sent by e-mail to the addresses you selected as permit recipient in the “Address data” step. Finally, the invoice is issued, but outside of the SA SP.
You can find your dossier in the dossier list at any time and select it to review the current status. Here you will also find the application document and later the permit document, as well as all other documents submitted (under “Documents” in section 5) or any additional queries and answers from you to the authority or vice versa (under “Comments” in section 5).
Error
If the button to the next step is not displayed, it means you have not yet completed all the data correctly. This applies to the buttons “Create a new application”, “Next” and “Submit for approval”. This may also happen if, for example, you have already completed the “Basic data” step at an earlier point in time and have continued to complete the application, but in the meantime the journey data you entered are in the past.
In such a case, check that you have completed all the fields marked with a red asterisk * and that no field is still marked with a red error message. Please also observe the validation rules explained above, especially concerning transport data and route details. Should you still not discover the error, select the first field of the form and navigate through the form with the tabulator key until an error or the button is displayed.
