Submit an application to FEDRO for a transit journey through the St. Gotthard or San Bernardino tunnel with dangerous goods according to ADR (see also Sonderbewilligungen - Tunneltransport Gefahrgüter).
Create a new application

To create what is known as an ADR application, select the menu item “Create a new application” (1) and complete the page that opens:
Select the application type “Transit through tunnels with dangerous goods ADR” (2) and enter a designation (3). You can freely choose the designation. It will help you to find the application again later. Under special details (4), you can, for example, enter the reference number of your order. This indication will help you to classify the application and does not have to be completed. Then choose the language in which the permit should be created (5). As the permit may contain instructions to the carrier, it is best to have it issued in the carrier’s language. This is independent of the language in which you complete the application. You can only press the “Create a new application” button (6) once you have correctly completed all the fields marked with a red asterisk *.
The dossier
When you press this button, a so-called dossier will be created and you will be shown the application-filing step:

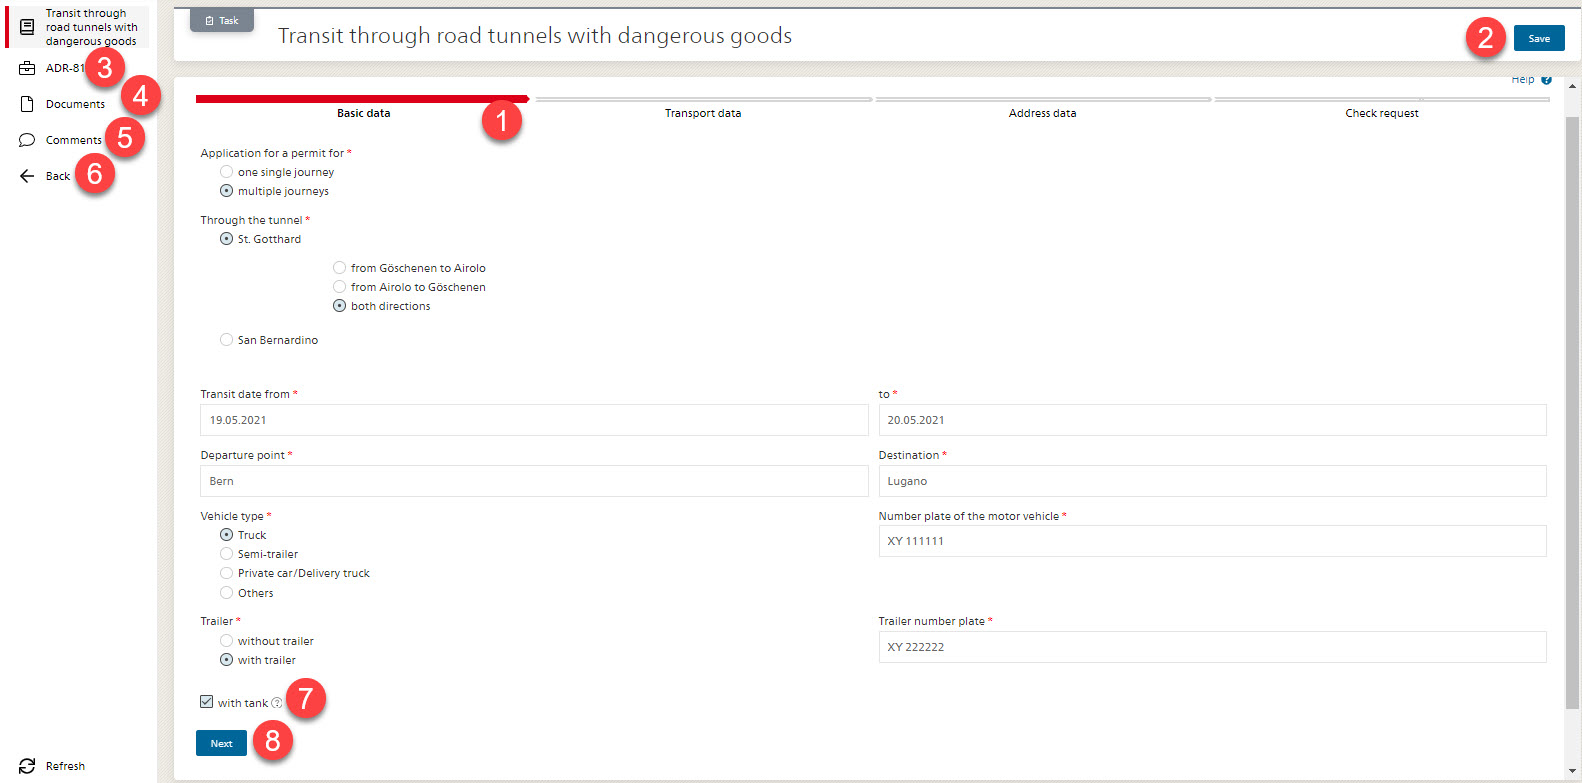
A dossier is a collection of all the data, tasks and documents created in connection with your application. The first task is to enter the application. This is done in several steps which you are guided through; the first is entering the basic data (1). If you are not yet able - or don’t want - to complete and submit the entire application, you can save it temporarily (2). You can also leave the screen for entering your data at any time. By clicking on the dossier number, here ADR-81 (3), you can access the detailed screen of the dossier. Later on, you can see here the status of the work of the approval authorities. But at present it appears you have not yet submitted your dossier, so no tasks will be found there yet for the authorities. You can also navigate to the document management function of the application (4), enter a comment for FEDRO (5) or go back to the dossier list and to the main menu (6) if, for example, you would like to enter an address before submitting the application.
If you exit the form without pressing Save, your entries made in the current step will be lost. But entries made in previous steps will remain saved.
ADR basic data
But to create the application, please now complete the details for the “Basic data” step. The fields that you have to complete are interdependent. For example, if you want to make an application for multiple journeys, you also have to enter an “until date” for the transit date. If the choice of vehicle types does not correspond to your vehicle, select “Others” and indicate the type in the text field. If you are driving with a trailer, you must also indicate its number plate.
If a field is marked with a small question mark, you will find more information on its meaning if you hover over it with the mouse (7).
Here too, you have to complete all fields marked with a red asterisk and a red text below the field will tell you when your entry does not comply with the specifications. Only when all the necessary fields have been correctly completed will the “Next” button appear (8). If you think you have completed everything correctly but the button still doesn’t appear, it’s best to navigate through the entire form with the tabulator, from field to field. In this way, any further error messages, if applicable, will be displayed.
“Next” will take you to the next step “Transport data”.
ADR transport data

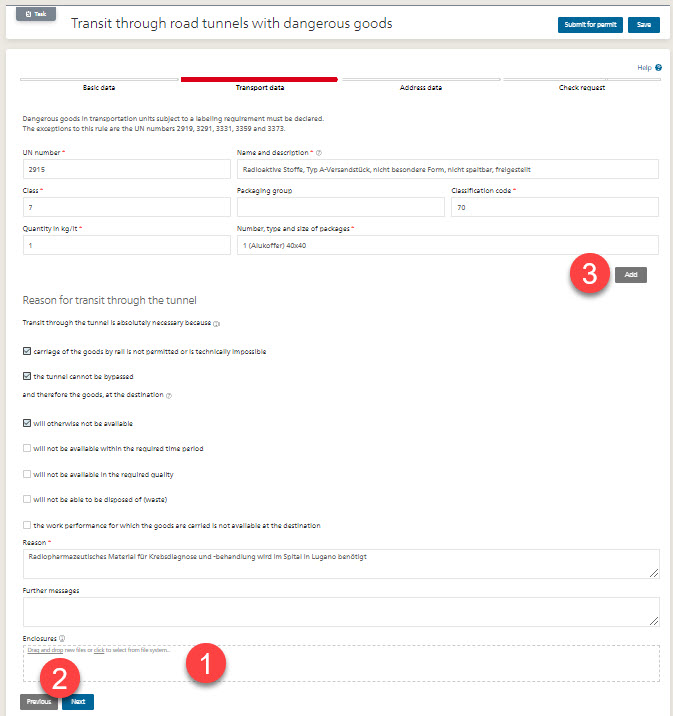
In this step you have to declare your dangerous goods and state the reason for the journey. If necessary, you can attach a document to your application (1). Various document formats are permitted. If you try to attach an unauthorized format or a document that is too large, an error message to this effect will be displayed and you will have to remove the document again. If it has been attached successfully, this will be indicated by a green bar.
As soon as you’ve completed all the data correctly, the “Next” button appears again. As you are now on step 2 of the application, there’s also the possibility of going back to the previous step to check or adapt it (2).
If you are carrying several different dangerous goods, you can use the “Add” button (3) to display another block for the necessary details. If such a block is displayed, you must also correctly complete all fields marked with an asterisk in this block. If you don’t need the additional block after all, you can remove it again with the small X on the right (4). Any entries in the block will be deleted as a result.

ADR address data
In the next step, you need to indicate the address data of the applicant, carrier and invoice recipient.

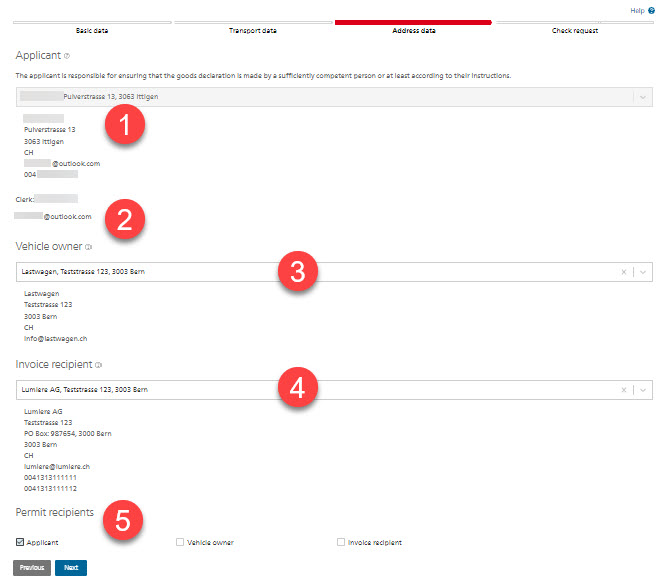
The main address of your group account is automatically selected, as you are responsible for this application as the applicant (1). You can’t choose another address here. Your name and e-mail address (2) are also displayed here. So, it can be seen which member of the group account created the application.
As vehicle owner (3) and invoice recipient (4), the main address of your account is also completed first. But here you can select any other address from your address management function. Since an ADR application is only sent to FEDRO, it is not necessary here to indicate an invoicing address in Switzerland, unlike with ET and SuNi.
Finally, you can indicate to whom the permit should be sent (5). Once it has been issued, it will be sent by e-mail to the selected parties. Confirmation of the application and the associated application document, on the other hand, will always be sent to the applicant’s e-mail addresses after submission (to you personally and to the main address) AND to the invoice recipient in order to inform him/her/it of the application.
Press “Next” here as well to check and submit the application.
Checking and submitting an ADR application

In the last step “Checking an application”, you can use the “Download preview” link (1) to generate a PDF version of the application so as to check your entries. To submit the application, you must tick the checkbox (2) to confirm that you have read and accepted the special terms and conditions. Only then will the button “Submit for approval” (3) appear. As soon as you press this button, the application will be submitted to FEDRO and you will receive a PDF version of it as confirmation by e-mail. The dossier overview will now be displayed:

Here you will find the so-called dossier number “ADR-81” (1), which is a unique identification of your dossier. By means of this number, you can find your dossier in the dossier list. The number will also be mentioned in every communication about the dossier. The detailed screen will display the current status of the dossier (2), includ-ing all open tasks (3) that now have to be carried out. In this case, FEDRO must check your address for invoicing purposes and prepare the permit document. You will find all open and already-completed tasks on the right, including your own - preparation of the application (4) - marked as completed. You will also find here the navi-gation options explained above (5). And if your plans should change, you have the option of cancelling your applications (6), i.e. withdrawing them as invalid. This is possible free of charge with an application filed to FEDRO, but only as long as the permit has not yet been issued.
What happens next?
The dossier will now be assessed by the approval authority (FEDRO). If any further details are required from you, the authority will get in touch with you via the comment function. You will be informed by e-mail, as you will if the application cannot be approved. As soon as the permit is issued, it will be sent by e-mail to the addresses you selected as permit recipient in the “Address data” step. Finally, the invoice is issued, but outside of the SA SP.
You can find your dossier in the dossier list at any time and select it to review the current status. Here you will also find the application document and later the permit document, as well as all other documents submitted (under “Documents” in section 5) or any additional queries and answers from you to FEDRO or vice versa (under “Comments” in section 5).
Error
If the button to the next step is not displayed, it means you have not yet completed all the data correctly. This applies to the buttons “Create a new application”, “Next” and “Submit for approval”. This may also happen if, for example, you have already completed the “Basic data” step at an earlier point in time and have continued to complete the application, but in the meantime the journey data you entered are in the past.
In such a case, check that you have completed all the fields marked with a red asterisk * and that no field is still marked with a red error message. Should you still not discover the error, select the first field of the form and navigate through the form with the tabulator key until an error or the button is displayed.
